Scripting Daily Geospatial Updates to Toronto Trees Using GeoPandas
Paulo Raposo, PhD
pauloj.raposo@outlook.com
2025-11-29.
© Paulo Raposo, 2025. Free to share and use under Creative Commons Attribution 4.0 International license (CC BY 4.0).


Photo by James Thomas on Unsplash.
Introduction
In this tutorial, we'll use GeoPandas, a powerful Python library for handling spatial data and attributes. GeoPandas allows us to use much the same procedures as any data scientist would use when using Pandas, a very popular library for all sorts of tabular data manipulation. While GeoPandas is not itself a full geographic infromation system (GIS), it allows us to do a lot of things we would normally use a proper GIS for, because it gives us access not only to the attribute rows of a vector geospatial file, but also its geometries.
To set the stage, we'll work with a fictional-but-realistic scenario based in the excellent City of Toronto, Canada. We'll use real municipal data, along with fictional reports meant to update the data.
Scenario
The City of Toronto keeps track of and maintains the municipality's thousands of publicly-owned trees. Road crews regularly travel to and maintain the trees, pruning when necessary.
A spatial point dataset exists of all the trees, including pieces of information like species and location, all tied to a unique identifier for each tree. This dataset is great for planning the dispatch of road crews and for a general sense of where urban greenery exists, but it has a known issue: while some trees are mapped quite precisely, others have only been geocoded to street addresses, and may therefore be significantly removed by several meters from their actual locations.
The City has begun a project to refine these data. From now on, road crews carry a tablet and a high-precision GPS receiver, and will act as surveyors while maintaining trees. Each workday, they use the existing map of trees to coordinate their work in a given area of the city, and they carefully take a GPS coordinate for each tree. Software on their tablets collects this information, and produces a CSV file of each tree the crew has reported on for the day. The data produced by each work crew each day include fields like these:
TREE_ID,WGS84_LAT,WGS84_LON,DIAMETER_CM
2349N3,43.722893,-79.392046,23
BN34E4,43.722870,-79.392051,18
...
We're the GIS staff for the City's tree re-mapping project. We're tasked with maintaining a living copy of the tree location point dataset, which we're updating daily when road crews send us their CSV reports. For every tree reported on, we need to do the following:
- Update the tree diameter;
- Move the tree's point location to the new coordinates if the new and old points differ by one meter or more. Since the locations are given in GPS coordinates (i.e., WGS84 latitude and longitude), we have to convert those to MTM10 coordinates for official Canadian use, that being the coordinate system the original data are in.
We receive three or four reports from road crews every day, each with several dozen trees reported on. Manually updating this in our ever-updating copy of the tree data is a pain, so we devise an automation plan:
- We'll keep a single GeoPackage copy of the trees dataset on our computer. We'll update that copy every day, keeping track of changes using Git. (We could also daily commit the revised GeoPackage file to a remote Git repo for backup purposes, perhaps on a municipality server we have access to). The script will print messages to the terminal when it makes changes, and we can record these statements to log files.
- We'll write a Python script that will handle all the geocomputation and data updating we need to do, using GeoPandas, as well as Shapely and PyProj (both come with GeoPandas as dependencies). That way we simply run our script over each CSV file we receive and let it do the geocomputation and updating for us.
- We'll write one more script, that automates running the GeoPandas scripts, given a list of CSV files.
With the above, all we need to do each day is make sure the CSV files we get from the road crews look to be in good format, and we can just run our scripts and commit to our repo.
Installing the software
We'll need Python and GeoPandas, both of which we get from the Anaconda Python distribution. If you haven't already, head to https://www.anaconda.com/download and download and install Anaconda (the free Community Access edition is fine for this demo, though look at the license terms in case you're working in a commercial environment).
Using our nice new conda package manager, we make a new Python environment (sort of like a separate Python installation with its own packages and dependencies) to make sure we don't mess with any default Python installations on our computer. Doing that, and installing GeoPandas all in the same command to our new environment (arbitrarily named "arbor") looks like this on the command line:
conda create -n arbor -c conda-forge geopandas
Above, we create a new environment with name (-n) arbor, and specifying a certain software channel (-c) named conda-forge, we ask for geopandas.
Finally, to start working with the software, we activate it on the terminal:
conda activate arbor
We'll also need Git, a popular version control system. It's preinstalled on most Linux distributions, and can easily be installed on Windows or Mac.
Downloading the data
Only the tree data is strictly necessary for our work here, but we'll also get roadway data so that any visualizations of trees can be in context with streets. These are the two datasets we need, both publicly available from the City of Toronto:
- Municipal Tree Data. Download as a GeoPackage in the MTM10 coordinate system from https://open.toronto.ca/dataset/street-tree-data/. (Unfortunately, the data lack a dictionary for attribute headers, but they don't look too hard to sleuth out. The field
STRUCTIDseems to be a unique identifier for trees, so we'll use that.) - Toronto Centerline (i.e., roads and paths). Download as a GeoPackage in the MTM10 coordinate system from https://open.toronto.ca/dataset/toronto-centreline-tcl/. These data do have a dictionary given on the webpage, though we probably don't need to use it in this tutorial.
Visualized quickly in QGIS, the data look like this:
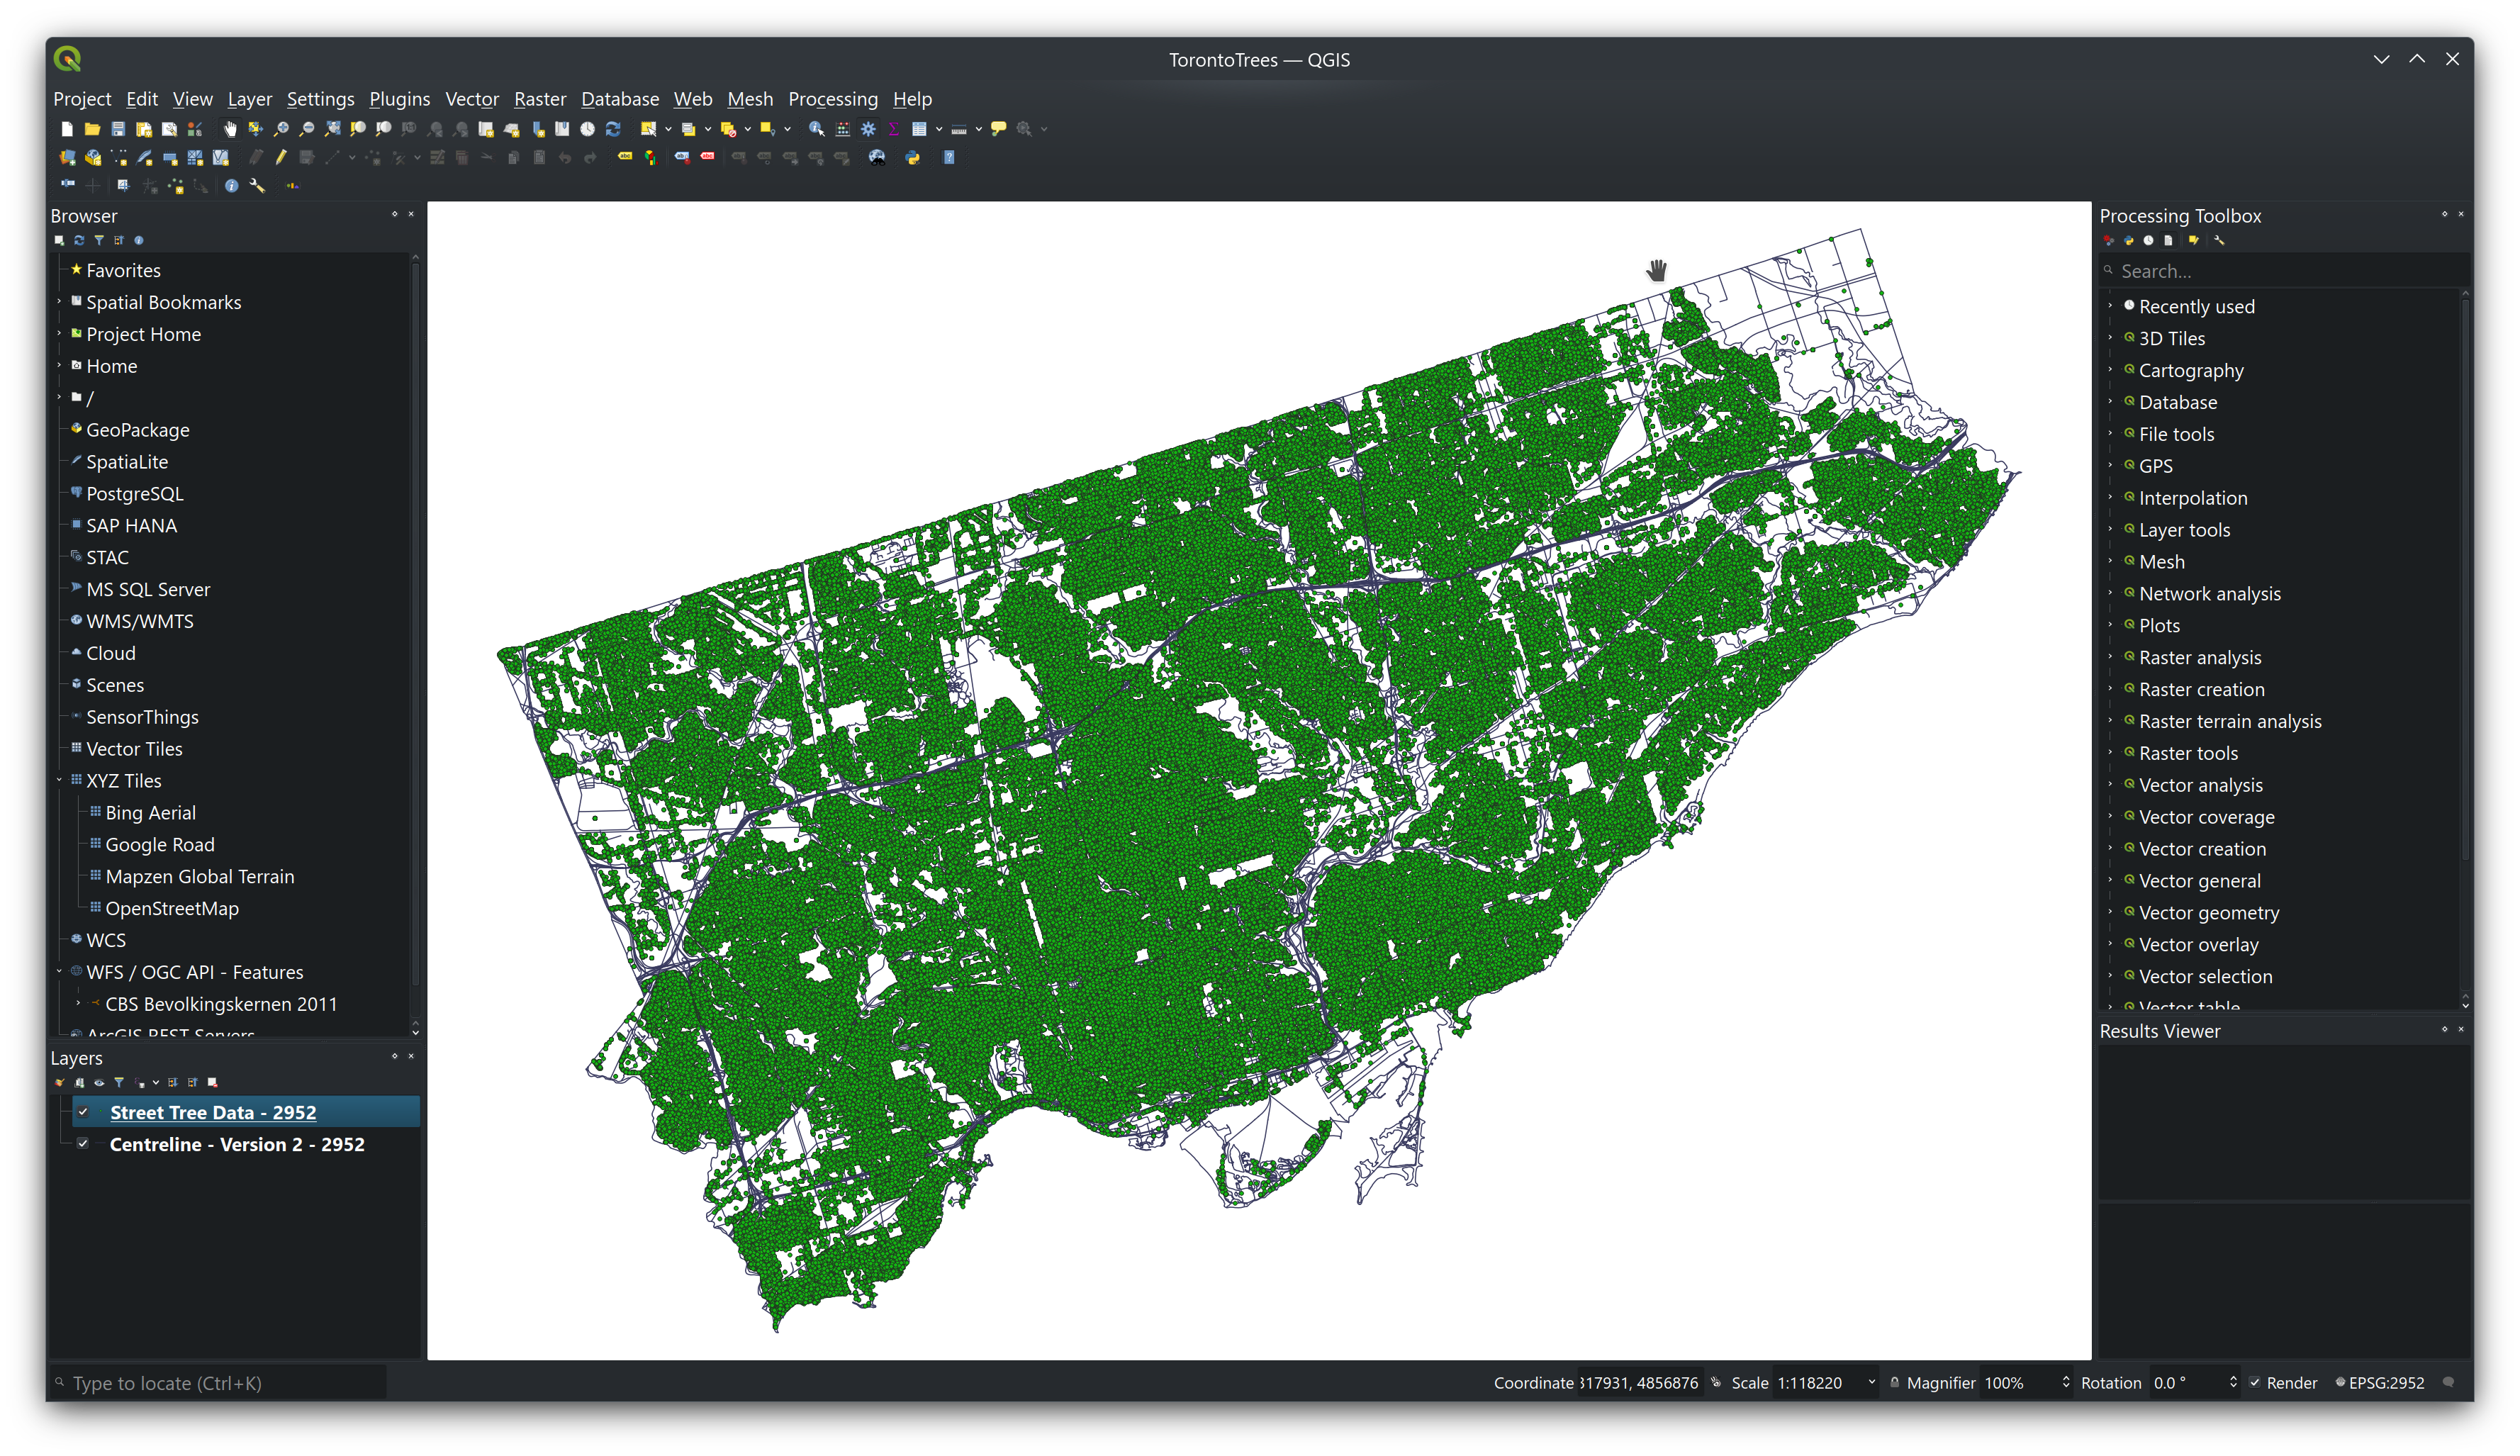
Preparations
Let's add one new attribute field to our copy of the trees data, to keep track of dates of update on an individual tree basis. Open the downloaded GeoPackage in QGIS, and right-click it in the Layers dialog to open its attribute table. It may take a moment to load the many records in this dataset. Then click on the little pencil icon on the far left, and then on the New field button:
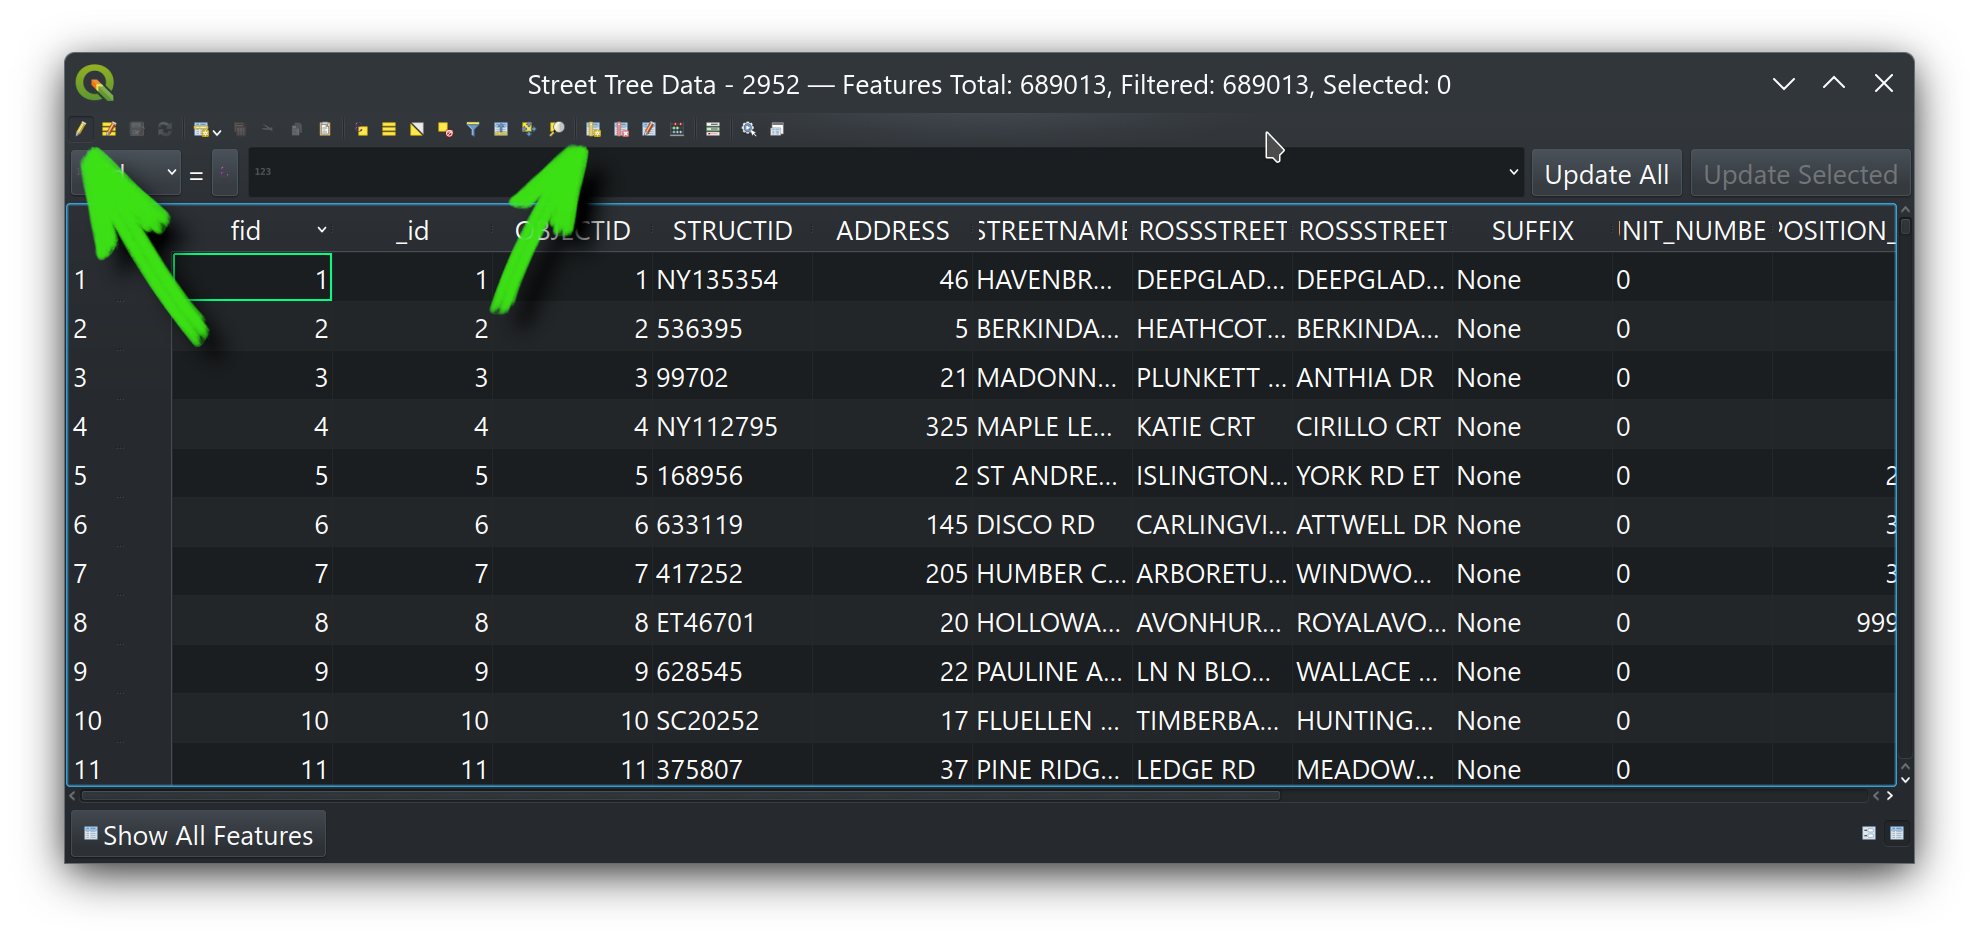
In the little dialog that opens, create a text (string) field called LAST_UPDATED (leave the length at zero). Click the pencil icon again to toggle editing off, choosing to save your edits. We'll use that new field in our script, indicating the date whenever we update a given tree.
That's all we need QGIS for, so go ahead and close it without saving a project file.
Next, I've made a directory on my computer where the project, including the data and scripts, will be placed:
/home/paulo/TorontoTrees
In a subfolder named Data is the trees GeoPackage we downloaded from the City of Toronto and to which we added the new LAST_UPDATED field. In the same folder we'll have another folder Road_Crew_Reports storing the daily reports we get from road crews. So our directory and file structure look like this:
/home/paulo/TorontoTrees
├── Data
│   ├── Road_Crew_Reports
│   │   ├── report_20251101_CrewA.csv
│   │   ├── report_20251101_CrewB.csv
│   │   ├── report_20251102_CrewC.csv
│   │   └── ...
│   ├── Centreline - Version 2 - 2952.gpkg
│   └── Street Tree Data - 2952.gpkg
└── Scripts
    ├── TreesUpdater.py
    └── DailyTreesUpdaterAutomation.py
We also initialize a Git repository in /home/paulo/TorontoTrees so we can daily commit the ever-updating dataset (and roll back if there's been any errors we need to deal with).
>>> cd /home/paulo/TorontoTrees
>>> git init
The geocomputation script
Where the real magic (i.e., work) happens. Below is our script, TreesUpdater.py, heavily commented to explain what each step does in detail. It general, it loads our trees GeoPackage file, and loads the given road crew CSV file we specify on the command line, using the information in the latter to update the former. The script handles coordinate transformations (from WGS84 to MTM10), and the check to see whether the tree location has moved at least 1 meter before updating its position. It also prints various messages to the terminal as it goes, which we'll use in the next script to make log files with.
#!/home/paulo/anaconda3/envs/arbor/bin/python3
# -*- coding: utf-8 -*-

#   .-.                              _____                                  __
#   /v\    L   I   N   U   X       / ____/__   ___   ___   ____ ___   ___  / /_  __  __
#  // \\                          / / __/ _ \/ __ \/ __ `/ ___/ __ `/ __ \/ __ \/ / / /
# /(   )\                        / /_/ /  __/ /_/ / /_/ / /  / /_/ / /_/ / / / / /_/ /
#  ^^-^^                         \____/\___/\____/\__, /_/   \__,_/ .___/_/ /_/\__, /
#                                                /____/          /_/          /____/


import argparse
import csv
from datetime import datetime
import geopandas as gpd
from pyproj import Transformer
import shapely
from shapely.geometry import Point, MultiPoint, GeometryCollection


# Some constants for where to find the trees data on disk.
trees_datafile = "/home/paulo/TorontoTrees/Data/Street Tree Data - 2952.gpkg"
trees_layername = "Street Tree Data - 2952"
driver_name = "GPKG"


def get_time():
    '''Returns a timestamp in ISO format to seconds precision.'''
    now = datetime.now()
    return now.strftime('%Y-%m-%dT%H:%M:%S')


def WGS84_to_MTM10(lon, lat):
    '''Returns an (x, y) tuple being an MTM10 coordinate having been
    transformed from given WGS84 lon and lat coordinates.'''
    transformer = Transformer.from_crs("EPSG:4326", "EPSG:2952", always_xy=True)
    return transformer.transform(lon, lat)


def main(road_crew_report):

    # Take note of the script runtime for indicating updates to trees.
    date_and_time = get_time()
    print(f"Script run: {date_and_time}.")

    # Read in the trees data into a GeoDataFrame.
    print(f"Reading in the trees data at '{trees_datafile}'.")
    trees_gdf = gpd.read_file(
        trees_datafile,
        layer=trees_layername
    )

    # Get the geometry GeoSeries. It contains Multipoint geometries, each
    # only containing a single point; for simplicity we explode the
    # Multipoints to Points, and since there's only actual x,y pair for
    # each Multipoint, we'll get single Points.
    geoseries = trees_gdf.geometry
    geoseries_exploded = geoseries.explode()

    # Read in the road crew report, and process each row (i.e., each tree).
    print(f"Processing road crew report {road_crew_report}.")
    with open(road_crew_report) as csvfile:
        reader = csv.DictReader(csvfile)
        for row in reader:

            # Get the id of the tree we're dealing with.
            this_reported_tree = row["TREE_ID"]

            # Check to see whether this tree is found in the GeoDataFrame. Proceed if it is,
            # and print a message for the log if it is not.
            if this_reported_tree in trees_gdf['STRUCTID'].values:

                this_index = trees_gdf.index[trees_gdf['STRUCTID'] == this_reported_tree]

                # Set the value of that tree in the GeoDataFrame for DBH_TRUNK
                # to the new value, given by "DIAMETER_CM" from the road crew.
                trees_gdf.loc[this_index, "DBH_TRUNK"] = float(row["DIAMETER_CM"])
                print(f"Updated {this_reported_tree} diameter to {str(row["DIAMETER_CM"])}.")

                # Next, we deal with the newly surveyed coordinates of the tree.
                # First, we find its coordinates in MTM10 (in eastings and
                # northings), converting from the WGS84 given by the road crew.
                this_reported_tree_eastings, this_reported_tree_northings = WGS84_to_MTM10(
                    row["WGS84_LON"],
                    row["WGS84_LAT"]
                )

                # Next, get the coordinates of this tree in the GeoDataFrame, and compare to see
                # how far apart they and the newly reported coordinates are. If they differ by
                # more than a meter, update the location in the GeoDataFrame.
                this_tree_geom = geoseries_exploded[this_index]
                # Pull the Point out of the 1-element series.
                this_tree_geom_p = this_tree_geom.iloc[0]
                # Construct a Shapely Point from the reported coords.
                reported_point = Point(
                    this_reported_tree_eastings,
                    this_reported_tree_northings
                )
                # Calculate the distance between the points.
                dist = shapely.distance(this_tree_geom_p, reported_point)
                # Conditionally update if distance is 1 m or more. Print a log
                # message to the terminal if so.
                if dist >= 1:
                    trees_gdf.loc[this_index, "geometry"] = reported_point
                    print(f"Moved {this_reported_tree} by {str(dist)}.")

                # Update the `LAST_UPDATED` field for this tree to reflect the time of this
                # script run.
                trees_gdf.loc[this_index, "LAST_UPDATED"] = date_and_time

            else:

                # If no match found in the GeoDataFrame, print message saying so.
                print(f"No match found for {this_reported_tree}.")

    # After each row of the report has been processed, overwrite the GeoPackage and
    # layer.
    print(f"Overwriting trees GeoPackage at '{trees_datafile}'.")
    trees_gdf.to_file(trees_datafile, layer=trees_layername, driver=driver_name)

    print("Script done.")


if __name__ == '__main__':

    parser = argparse.ArgumentParser(
        description="Script for updating Toronto tree data from survey reports."
    )
    parser.add_argument("INCSVREPORT",
        help="The formatted input CSV file from a road crew."
    )
    args = parser.parse_args()
    main(args.INCSVREPORT)
Automating the automation
Our script above automates the geocomputation and updating, given one road crew report. Most days we receive a few such reports, not just one. So we write one more script, DailyTreesUpdaterAutomation.py, which will handle running our geocomputation script for each report file. That way, we only have to run this script once per day over all the reports we receive.
#!/home/paulo/anaconda3/envs/arbor/bin/python3
# -*- coding: utf-8 -*-

#   .-.                              _____                                  __
#   /v\    L   I   N   U   X       / ____/__   ___   ___   ____ ___   ___  / /_  __  __
#  // \\                          / / __/ _ \/ __ \/ __ `/ ___/ __ `/ __ \/ __ \/ / / /
# /(   )\                        / /_/ /  __/ /_/ / /_/ / /  / /_/ / /_/ / / / / /_/ /
#  ^^-^^                         \____/\___/\____/\__, /_/   \__,_/ .___/_/ /_/\__, /
#                                                /____/          /_/          /____/


import argparse
from datetime import datetime
import os
import subprocess
import time


# Paths to our arbor environment interpreter, the tree dataset, and the
# directory holding our data files (where log files will go).
python_interpreter = "/home/paulo/anaconda3/envs/arbor/bin/python3"
tree_updater = "/home/paulo/TorontoTrees/Scripts/TreesUpdater.py"
data_dir = "/home/paulo/TorontoTrees/Data"


def get_time():
    '''Returns a timestamp in ISO format to seconds precision.'''
    now = datetime.now()
    return now.strftime('%Y-%m-%dT%H:%M:%S')


def main(report_list):

    # For every road crew report received, we run a subprocess terminal
    # call to process it with the TreesUpdater.py script.
    n_reports = len(report_list)
    for i, report in enumerate(report_list):

        print(f"Processing {report}, {i+1} of {n_reports}...")

        # Get the time of this run for the name of the log files.
        now = get_time()
        log_file = os.path.join(data_dir, f"log_{now}.txt")

        # Build and execute a command string that runs the tree updater
        # script, and redirects printed messages to the log file.
        cmd = f"""'{python_interpreter}' '{tree_updater}' '{report}' > '{log_file}'"""
        subprocess.call(cmd, shell=True)

        # Wait one second to make sure the next script run will be at
        # least one second after the last.
        time.sleep(1)


if __name__ == '__main__':

    parser = argparse.ArgumentParser(
        description='''Script to run the tree updater script for each road
        crew report received.'''
    )
    parser.add_argument('REPORTS',
        nargs='+',  # At least one file necessary.
        help='One or more input road crew report CSV files.'
    )
    args = parser.parse_args()
    main(args.REPORTS)
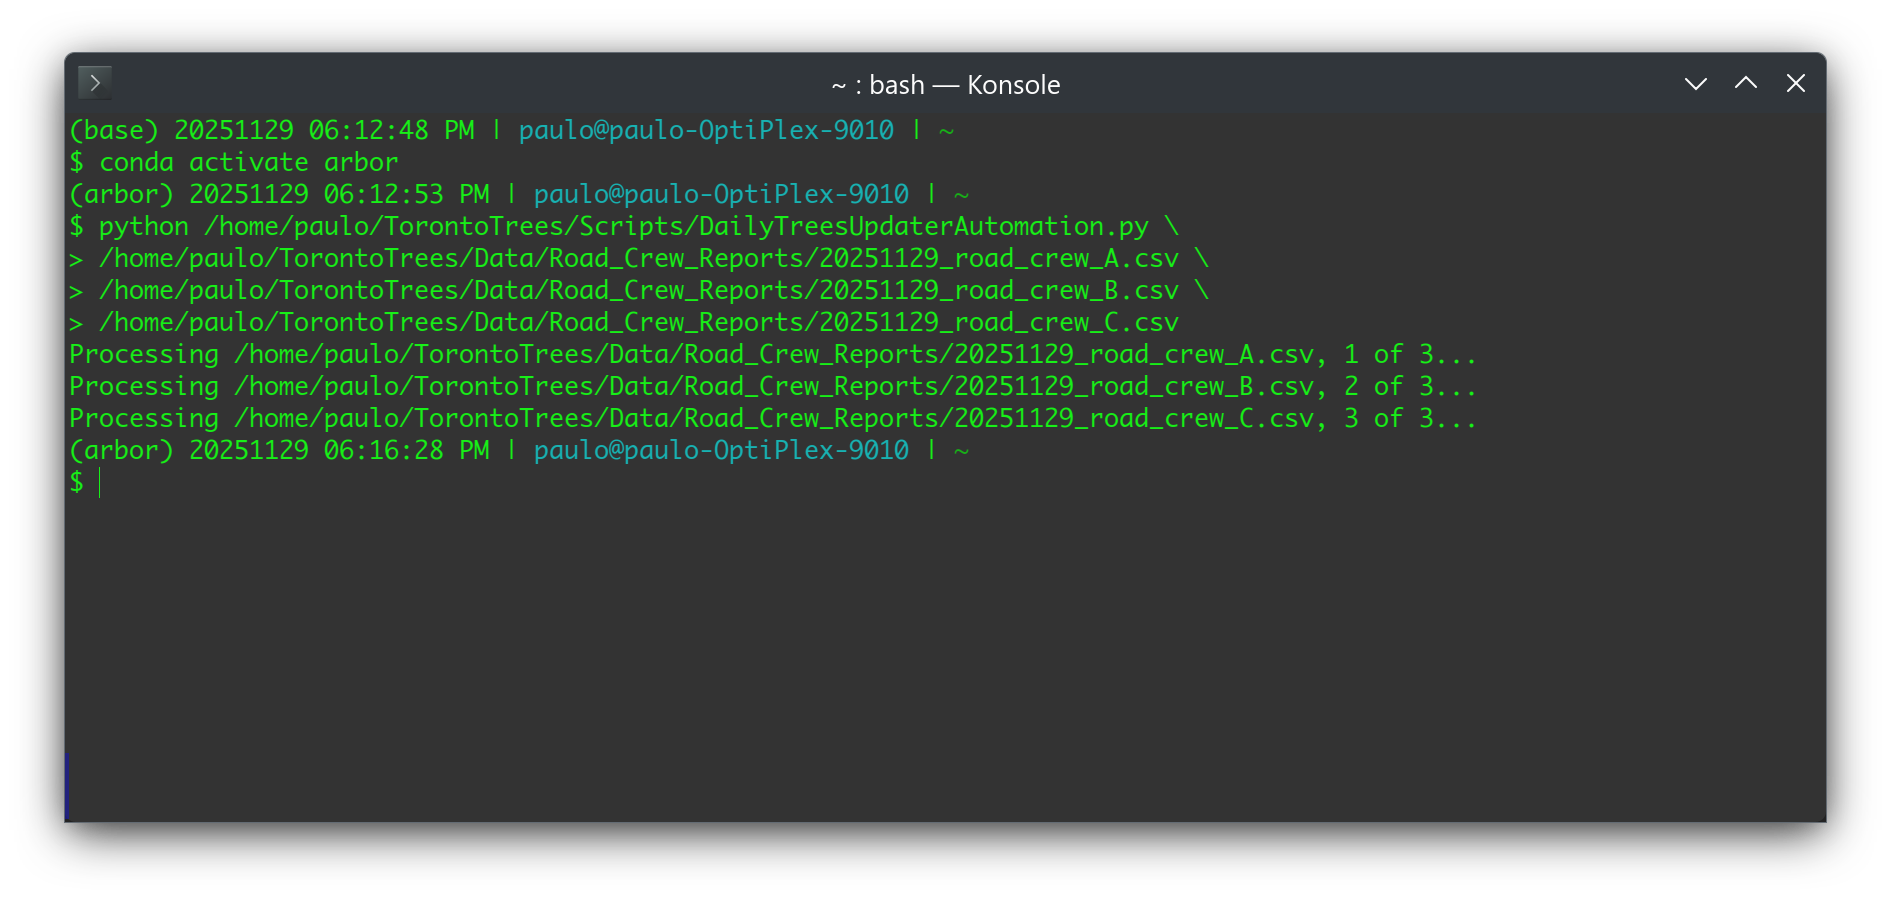
With the two scripts done, we would have two simple commands to run in a terminal each day: one to activate our arbor conda environment, and another to run our DailyTreesUpdaterAutomation.py script. Here's an example of what that looks like for 3 road crew reports:
The last thing to do each day is then to stage and commit changes to a Git repository set up in /home/paulo/TorontoTrees (and possibly push the changes to a remote repo we've set up for backup purposes).
>>> git add --all
>>> git commit -m "Update for 20251129."
>>> git push origin main
And that's it! The whole process takes a mere few minutes each day, and is far less subject to human error. Also, the log files we create with each script run, as well as the Git repository, allow us in future to look up every change made per day.
Files
Here are downloadable versions of the scripts and some fictional, sample road crew reports in case you'd like to reproduce the above. You'll just have to change the file paths in the scripts to reflect your own system.
TreesUpdater.py
DailyTreesUpdaterAutomation.py
20251129_road_crew_A.csv
20251129_road_crew_B.csv
Conclusion
Demonstrated above is one way to solve such a problem, and there are of course other ways. We also didn't optimize for efficiency (e.g., the TreesUpdater.py script could have taken multiple reports with only one reading-in of the trees GeoPackage, saving a few seconds of computation time), but it's not critical in our use case here, and we're definitely being far more efficient than doing it manually each day.
This example hopefully illustrates the power of geospatial scripting with libraries such as GeoPandas, as well as how a bunch of up-front effort can save you a lot of work in the long run.
Photo by Bruce Sanchez on Unsplash